| Priest Self-Propelled Artillery | |||
|---|---|---|---|
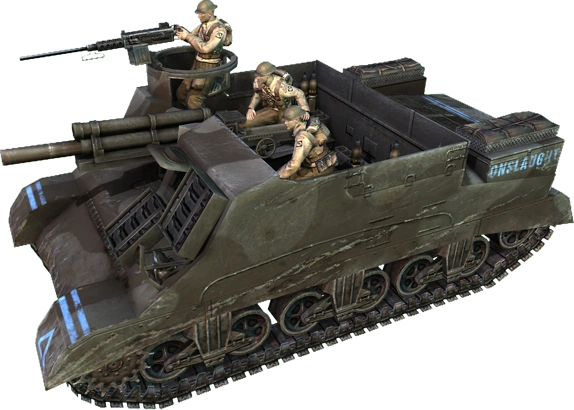 A Priest 105mm SPG | |||
| Army | British | ||
| Role | Mobile Heavy Field Artillery | ||
| Unit Cost |
| ||
| Upkeep per Minute |
| ||
| Prereq. | Royal Artillery Support: Priest 105mm SPG | ||
| Produced By | Company Commander Ability | ||
| Primary armament | 105mm M2 Howitzer | ||
| Secondary armament | M2 Browning .50 Heavy Machine Gun | ||
| Armor | Light-Medium | ||
| Max. Speed | 4 m/s | ||
| |||


The Priest Self-Propelled Artillery, also called the M7 Priest or Priest 105mm SPG, is a mobile heavy artillery unit fielded by the British Royal Artillery Support company in Company of Heroes: Opposing Fronts. Although only three can be fielded at any given time, their superior range and mobility make them one of the most dangerous units on the battlefield. They can perform every bit as well as a 25 Pounder Gun Howitzer, with almost twice as much damage delivered per shell, at only a slightly higher cost.
Overview[]
With the Royal Artillery Support Command Tree, the British army receives many powerful upgrades to its basic 25 Pounder Gun Howitzer emplacements, allowing them to fire further and perform artillery reactive fire. However, this command tree culminates with a powerful alternative to the static 25 Pounder, in the form of a 105mm Priest Self-Propelled Artillery.
The Priest 105mm is a mobile artillery unit, basically a 105mm Howitzer mounted on the chassis of an M4 Sherman tank. It is called in to the field using the Priest 105mm SPG Command Ability, which is acquired through the Royal Artillery Support tech tree. This ability costs ![]() 625,
625, ![]() 12. This makes the Priest more expensive in Manpower and Population Cap than a 25 Pounder Gun Howitzer, though it requires no Fuel at all.
12. This makes the Priest more expensive in Manpower and Population Cap than a 25 Pounder Gun Howitzer, though it requires no Fuel at all.
The 105mm Howitzer installed on a Priest has significant range, and can strike targets very far away. Due to the progression of command upgrades required for calling in a Priest, it comes already equipped with the ability to perform Creeping Barrages for a hefty cost of ![]() 150. Additional purchase of Royal Artillery Support Command Upgrades will unlock a significant range increase for the gun, and two reactive artillery firing modes.
150. Additional purchase of Royal Artillery Support Command Upgrades will unlock a significant range increase for the gun, and two reactive artillery firing modes.
The Priest's main advantage is the devastating impact of its shells. It is one of the heaviest-hitting weapons in the game, causing 200 points of damage in a 7 meter radius, thereby killing infantry and destroying vehicles with ease. It also does significant damage to buildings, despite a large damage reduction applied to this kind of target.
In tactical terms, the ability to move one's artillery to where it's needed means that the gun can be protected, both from enemy attacks along the defensive line as well as from return-artillery-fire from enemy positions, which normally puts stationary guns like the 25 Pounder Gun Howitzer at great risk. The Priest can unleash its barrage close to the front lines (reaching all the way to the enemy base, usually), then withdraw to safety in the Fog of War, recharge and repeat.
Note: It can be usefull to know that the Cromwell Command Tank provides bonuses to the Priest as if it was a tank. This, on one hand, slightly increases the range of the Priest, which is not a big difference since this artillery gun has already a very long range. But most importantly, the Cromwell Command Tank improves the reloading times of the Priest main gun.
This does not mean the Barrage ability recharges faster, but that each shot takes less time to reload. This means that once the first shot hits the ground, the enemy will have less time to get away from the rest of the shots of the artillery barrage. Also this could help to the Priest to do its artillery barrage faster, so he can get away of the position more quickly.
Weapons[]
The Priest 105mm has an interesting combination of two very different weapons. The first is its primary gun, a 105mm Howitzer built into the hull of the tank. The second is a Browning M2 .50 Caliber Heavy Machine Gun, which is terrific at suppressing and killing infantry.
105mm Howitzer[]
The American 105mm Howitzer is a short-barrelled artillery piece capable of lobbing 105mm shells that are set to explode on impact. Each of these shells explodes with tremendous force, sending shrapnel and rocks flying through the air at great speed, killing infantry and destroying light vehicles.
The shells explode with one of the highest damage outputs in the game - 200 points per blast. This is 75 points more than the explosive power of a 25 Pounder Gun Howitzer's shells. However, the shell is loaded with a high-explosive charge, rather than a penetrating charge, which means it will blow away a large area but may do little damage to armored targets.
The area of a single blast is 7 meters wide. Within 1 meter, enemy units receive a whopping 400 damage, which is enough to kill most light vehicles, halftracks and armored cars, assuming it can penetrate the armor. At around 3 meters away from the blast, targets still receive 150 points of damage, and at 7 meters they take 60 points of damage - enough to kill infantry. Needless to say, obstacles within the explosive radius are likely to be obliterated as well.
105mm shell explosions will do damage to most vehicles, especially when they are close to the blast. If by chance it hits a vehicle's rear armor, it has some chance to penetrate it, either destroying or heavily damaging the engine or blowing the vehicle away entirely. This is sometimes true even for enemy heavy tanks.
Buildings suffer reduced damage from shelling. Nonetheless, they will eventually succumb to continuous bombardment. Infantry inside buildings are not as well protected, and can be knocked out by a single blast landing close to the building.
The range of these shells is (by default) 175 meters, more than half a map's width. Note however that firing these at targets less than 35 meters from the cannon is not allowed at all, so the weapon cannot engage nearby targets in defense of itself. That's why leaving a Priest 105mm to fend for itself will normally lead to it being destroyed.
Browning M2 .50 Cal Heavy Machine Gun[]
The .50 Cal HMG is a powerful, belt-fed automatic weapon mounted on a pintle on the top-right side of the Priest chasis. This Machine Gun can fire long bursts of heavy bullets, and is used primarily for suppressing and destroying infantry or even light vehicles.
The damage output for the .50 Cal is double that of the normal tank-mounted machine gun. Infantry in the open will succumb after about 3-4 bullets, meaning that the average .50 Cal will wipe out a unit of infantry rather quickly. This offers the Priest some protection from enemy infantry that manage to get close to it.
Thanks to the pintle mount, this HMG can fire 360 degrees around the Priest as required.
Abilities[]
By default, the Priest Self-Propelled Artillery has only a single ability, Priest 105mm Howitzer Barrage, which serves as the weapon's only method of attack. Due to the preset progression of Command Upgrades required to deploy the Priest, it should come with the Creeping Barrage ability already enabled.
With Royal Artillery Support selected by the British player, the weapon will quickly receive up to 3 additional kinds of abilities that allow it to fire further and perform two types of reactive artillery shelling.
 Priest 105mm Howitzer Barrage[]
- Costs nothing
- Activation: Select Ground
- Cooldown: 105 seconds
The Priest 105mm Howitzer Barrage is the Priest's only primary attack - a manually-activated shelling of a selected target area.
When activating this ability, select a point on the ground. The Priest 105mm will move to within 35-175 meters of the target, and will then fire exactly 6 shells at the targets area.
The further away the target, the less accurate the shells. Firing at a target 40 meters away will generally land all shells right on top of it, while firing at a target 175 meters away will scatter the shells within a large radius around the center.
Note that the target does not need to be visible. You may shell any point inside or outside the Fog of War. Remember that the Priest will need to move to within at least 175 meters of its target, so selecting a target deep within enemy territory may cause the Priest to advance beyond your front lines on its own...
105mm Range Boost[]
- Costs nothing
- Activation: Select Ground (within 35-225 meters from the gun)
- Requires the Royal Artillery Support: Super Charge Artillery ability
- Replaces the Priest 105mm Howitzer Barrage ability
- Cooldown: 105 seconds.
This ability is identical to the Priest 105mm Howitzer Barrage ability (see above), serving as the cannon's only primary attack. It replaces that ability entirely, once acquired.
The only difference is in the range of your shells. The Priest will move to within 225 meters of the target before it can begin firing. This allows the unit to fire at targets clear across the map - sometimes all the way over to the enemy base. It will rarely need to actually move at all.
Again, accuracy drops with range, so it may still be better to place the gun closer to your front lines (as long as you can keep it safe) to capitalize on the increased accuracy.
Creeping Barrage[]
- Costs 150
- Activation: Select Ground and Direction (within visible territory)
- Requires the Royal Artillery Support: Creeping Barrage ability
- Cooldown: 60 seconds
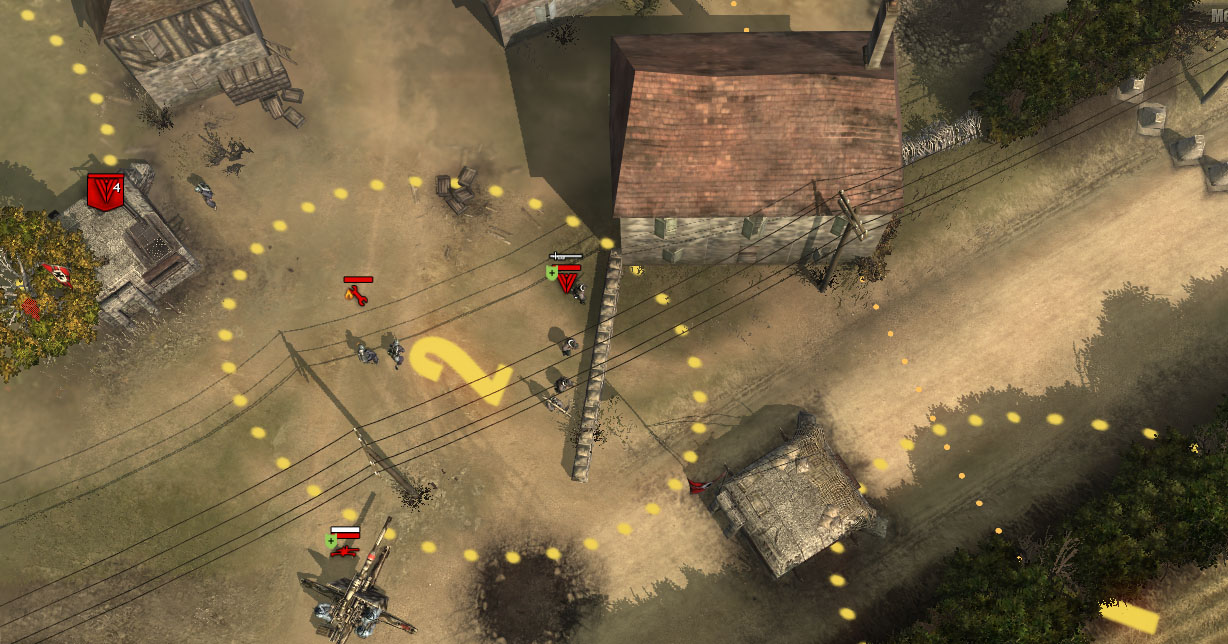
Lining up a Creeping Barrage on an enemy's defensive position.
When activating the Creeping Barrage ability, select a ground target anywhere within visible territory to serve as the "middle-point" of the barrage. Then select a direction. The 105mm Howitzer will fire around 15 shells, starting from the "beginning" of the barrage area, through the center-point, and towards the "end" area. This will generally bombard an area 70-meters long and 15-meters wide.
The center-point must be within visible territory - i.e. not in the Fog of War. However, there are no real range constraints (other than the minimum 35-meters-from-the-gun constraint).
In truth, this barrage incorporates both shells fired from the howitzer itself and shells fired from off-map artillery, which basically increases the amount of shells landing in the targeted area without increasing the firing time. Both types of shells are identical anyway.
As its name implies, the barrage "creeps" forward along the direction you've set when activating it. The area marked as "1" on the screen when targeting this ability will be shelled first, then the area marked "2", and only then the area marked "3". One benefit to this is to catch the enemy by surprise, as they often withdraw from area 1 when the shells start falling, but won't always realize that the bombardment is going to cover a lot more ground than a normal barrage.
You can use the Creeping Barrage to cut a hole through enemy defenses by "directing" it through the enemy lines. Alternately, you can orient it "sideways", to obliterate an entire line of enemy defenses. The call is yours, and is based entirely on the requirements of the situation and the distribution of targets.
Another great use for Creeping Barrage is to remove land-mines from a major road. This barrage can clear any entire section of road where you suspect mines to be hidden.
When several artillery pieces use Creeping Barrage simultaneously, you can arrange the barrages to clear a box-shaped area, by firing the barrages 15 meters next to each other, oriented in the same direction. This can wipe out an entire enemy-occupied area within a few seconds.
NOTE: For this type of barrage, the Priest 105mm actually fires 25 Pounder shells, making this ability identical to the 25 Pounder Gun Howitzer's Creeping Barrage ability. As a result, the impact of each shell is significantly reduced (125 damage instead of the normal 200 damage)! It is still quite a devastating barrage, of course, with 15 shells rapidly hitting the target area, but each impact is less powerful than that of a regular 105mm barrage.
Overwatch Barrage[]
- Costs nothing
- Activation: Select Ground (within visible territory up to 250 meters away)
- Requires the Royal Artillery Support: Overwatch Artillery ability
- Permanent until deactivated
- While active, Prevents the use of other abilities
- Cooldown: 22 seconds (on deactivation)
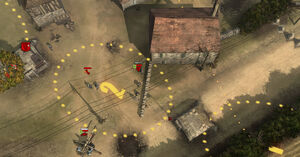
An air-burst shell from an Overwatch Barrage explodes in a radius of 8 meters.
When Overwatch Barrage is activated, select a ground target within visible territory. The Priest 105mm will rotate to face that target, and wait until it detects enemy units within ~15 meters of the targeted point.
If any unit is detected entering the target area, the Priest 105mm will quickly fire three air-burst shells at it. These shells are significantly different from normal shells; they airburst above their targets over a larger radius of 8 meters, dropping several bursts of shrapnel within that area. This randomizes damage in the overwatched area, as the scattered shrapnel can leave gaps untouched, or hit targets multiple times.
The target area can only be placed within visible territory, and within 250 meters of the gun itself. If visibility of that area is lost, the gun won't fire because it can't detect targets there. However, the Overwatch Barrage order will not cancel itself. You can re-establish eye-contact with the target area to resume bombardment.
While Overwatch Barrage is active, the artillery cannot use any of its other abilities. In addition, it will not participate in any Victor Target barrages (see Captain). You can order the artillery to stand down from Overwatch Barrage mode at any time. It takes 22 seconds to reset the gun for normal operations.
Overwatch Barrage is most useful for denying access to a certain area. The enemy will quickly learn that moving through the target area is extremely dangerous, and will look for other avenues of approach. This may force him to go through mined territory, to use choke-points or open ground for his advances, or otherwise disrupt his attacks. If possible, use several artillery pieces to Overwatch several such approaches, forcing the enemy to either go through them or be funneled into kill-zones protected by your other units.
Overwatch Barrages can quickly destroy bridges, as each individual piece of shrapnel in a burst is a separate blast, which partially bypasses the Allied artillery penalty against bridges.
Counter Battery[]
- Costs nothing
- Activation: Immediate
- Requires the Royal Artillery Support: Counter Battery ability
- Permanent until deactivated
- While active, Prevents the use of other abilities
- Cooldown: 22 seconds (on deactivation)
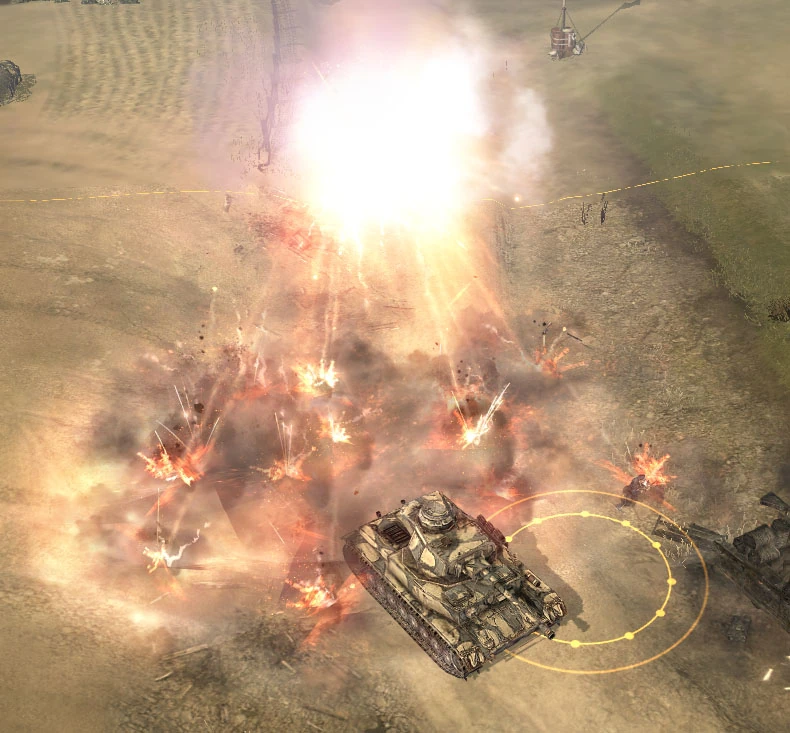
When Counter Battery is activated, the Priest 105mm will immediately set itself to "search and destroy" mode. It will sit still and wait until an enemy artillery piece, even Mortars, fires its weapons at your units. It will then return fire at that position with 3 very-accurate shells. If the target was foolish enough to remain stationary (or can't move to begin with), it will surely be destroyed. The Priest 105mm will continue to respond to enemy artillery fire automatically until this ability is deactivated.
This allows you to quickly react to enemy artillery fire without having to aim the Howitzer yourself. It prevents enemy artillery from using the fog-of-war to ensure their artillery won't be attacked.
Unfortunately, most Axis artillery units are very mobile. All they have to do is to launch their rockets/shells and quickly retreat, in which case the counter-battery fire will simply hit the position they were in, doing no actual damage. This is especially true when playing against the AI, which virtually always retreats its artillery after firing a barrage.
While Counter Battery is active, the artillery cannot use any of its other abilities. In addition, it will not participate in any Victor Target barrages (see Captain). You can order the artillery to stand down from Counter Battery mode at any time. It takes 22 seconds to reset the gun for normal operations.
Tactics[]
For any player who is familiar with the use of a 25 Pounder Gun Howitzer emplacement, the Priest 105mm should not offer any surprises. It is, in many ways, a mobile version of the 25 Pounder, with improved damage output. Therefore, other than tactics concerning its mobility, it should be used in the same way as a 25 Pounder for distributing its firepower around the map. For more information on that, see the 25 Pounder Tactics section.
The advantage of mobility is the primary reason that makes the Priest 105mm preferable to the 25 Pounder. In truth, due to the Royal Artillery Support's Supercharge Artillery Rounds upgrade, both these units should be able to bombard any point on the map, meaning that Priests don't actually have to move around that much to get within range of their targets. But the ability to move one's artillery from location to location gives it something more important: protection.
The mobile Priest 105mm's mobility allows it to move towards the front line to fire its barrage, then retreat back to safety near the British base. As a result, enemy artillery cannot effectively target the Priest, at least not as easily as it can target the entrenched 25 Pounder emplacements.
Replacing all your 25 Pounder Gun Howitzers with Priest 105mms may or may not be a good idea. Priests take up ![]() 12, 2 points more than a 25 Pounder, which may stretch your population cap distribution. Of course, since the Royal Artillery Support company's strategy revolves around powerful artillery, the investment in three Priests may be your surest bet - possibly worth reducing the size of your attack force or even your defensive line, to keep three Priests and one or more 25 Pounders at the same time - for the added firepower.
12, 2 points more than a 25 Pounder, which may stretch your population cap distribution. Of course, since the Royal Artillery Support company's strategy revolves around powerful artillery, the investment in three Priests may be your surest bet - possibly worth reducing the size of your attack force or even your defensive line, to keep three Priests and one or more 25 Pounders at the same time - for the added firepower.
Weaknesses[]
The Priest is constructed out of an M3 Lee tank chasis. This offers it almost as much protection as an M4 Sherman, which means invulnerability to small-arms fire and some protection against other weapons. However, it is still very vulnerable to anti-tank fire. A couple of shots from a dedicated anti-tank cannon will destroy a Priest, and so will several anti-tank rockets (from Panzerschreck or Panzerfaust) to the side or rear. And since the Priest can do little against other units, direct combat with anything remotely dangerous should be entirely avoided.
When the Priest is operating from behind your own defenses, position it where those defenses can keep it safe, for instance behind AT guns. When operating outside the defensive line, keep it protected by tanks and/or infantry.
In both cases, however, keep the Priest mobile. The one major danger to all artillery pieces in the game is counter-artillery fire. The Priest's #1 defense against this, thanks to being mobile artillery, is to move away after every volley so that the enemy has to guess where your Priest is parked. This is true even when behind your own lines. A few lucky shots from enemy artillery will knock the Priest out entirely - not to mention a single shot from a Hummel.
Quotes[]
Trivia[]
- One of the quotes that the crewmen of the Priest makes after clicking them too often are spoken in French, indicating that the crewmen of the Priest are actually Canadiens, or French Canadians.
Gallery[]
")
")
")
")
")
| British Arsenal | |||||||||||
|---|---|---|---|---|---|---|---|---|---|---|---|
| Command Trucks | |||||||||||
| Infantry Squads | |||||||||||
| Light Vehicles | |||||||||||
| Medium Vehicles | |||||||||||
| Heavy Vehicles | |||||||||||
| Command Units | |||||||||||
| Defensive Structures | |||||||||||
| Other Structures | |||||||||||
| Royal Support | |||||||||||
| Royal Support-specific Units |
| ||||||||||
| Royal Support-specific Structures |
| ||||||||||